It is April 19th and it is snowing outside. Snowmobiling season has long been over and ATV season has not yet begun. These are the “dead” months here in the Northwoods of Wisconsin. Warm and sunny one day, cold and dreary the next. Not much going on. A lot of businesses in the area use this time as their opportunity to take a break and go on vacation before the big summer season starts. These “between season” times seem to drag on forever. I look out the window longingly at my hammock…it was only a few days ago I was laying there listening to the birds and shielding my eyes from the bright sun. Much too cold for that today. And tomorrow is not looking good either. I have Spring Fever bad. BAD. I had fun in the snow this winter, but I am so ready for fun in the sun this summer! How am I going to get through these doldrums? Well, this is the perfect time to get to work on my new garden!
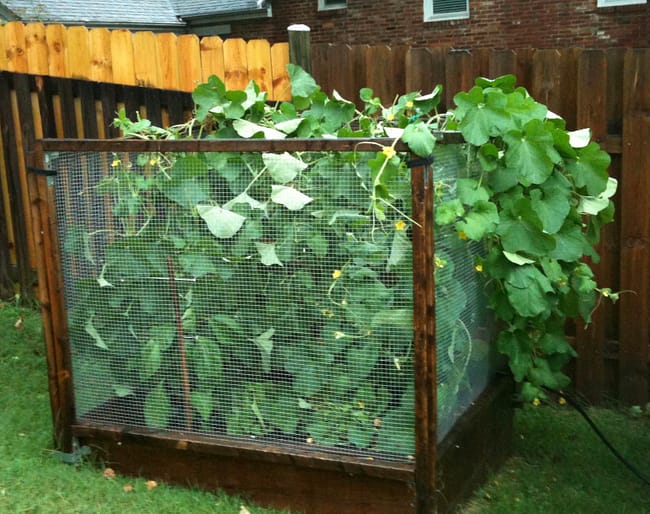
Years ago, when I lived in Virginia, I had four raised beds that I used to grow vegetables. I have to admit I am not that much interested in flowers, it is the edible plants that interest me. I loved to wake up in the morning, grab a cup of coffee, walk out my door to my raised beds and check out my crops. There is nothing more beautiful, in my opinion, than a yellow-orange, newly opened squash blossom glistening with dew in the early morning sun. Somehow I neglected to save a picture of a squash blossom, but I do have a picture of one of my raised beds overflowing with a cucumber vine…
Anyways, time to get on with it! And that means starting my seeds. This year I ordered all new seeds from Seed Savers Exchange (SSE) in Decorah, IA. It is a place that is near and dear to my heart. It is close to where Scott’s sister lives so I get to visit frequently. Since 1975, SSE has been collecting, storing and regenerating the seeds from thousands of rare, heirloom and open-pollinated plants. Their farm and headquarters in Decorah has a similar climate to mine here in northern Wisconsin so the seeds I bought stand a good chance of being able to grow here. If you ever find yourself in Decorah, IA do make it a point to visit the farm. Visitors are welcome to go hiking on the trails, fishing in the stream, strolling through the orchard and admire the gardens. Plus, they have a great gift shop!
After my seeds arrived, I made a spreadsheet listing all the varieties. Using the information on the back of the seed packet, I noted the date that I should start, meaning plant, the seeds. This is usually derived from counting days backwards from the “last frost date” for the location you want to grow your plants. For example, the Stupice Tomato packet said to start the seed indoors 6 weeks before last frost. I went to The National Gardening Association’s website to find my last frost date using my zip code. I figured out that May 31st is a good day to use as my last frost date, but surprisingly I have a 10% chance of getting a frost as late as June 28! Yikes! So my goal is to set my starts out in the garden on or after May 31, but be ready to protect them from cold temperatures as late as June 28. So, counting backwards from my chosen date of May 31, I arrived at April 19th as the day I should start my tomatoes and any other plants that I had calculated should be started 6 weeks before last frost date.
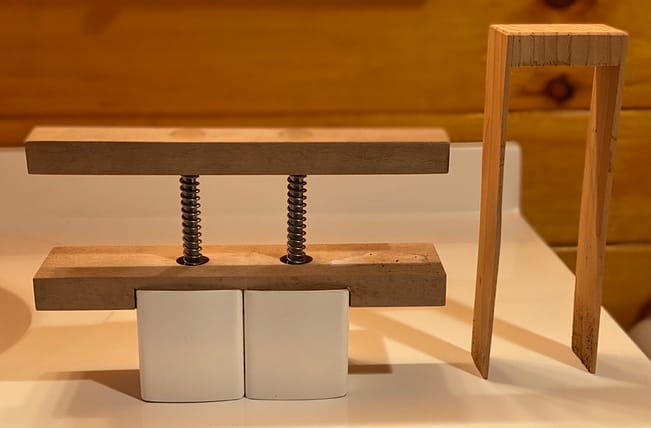
I start my seeds using a Soil Cube. I have had the tool for many years and use it to form compressed cubes of soil that act as a “pot.” I was going to link to the tool here but the domain has expired. Perhaps the company went out of business? No worries, there are many similar tools and you can find one by doing an internet search on the term “soil cube” or “soil blocker.” Here are two pictures of my Soil Cube…
I like using the Soil Cube for a few reasons. To start with, I don’t have to buy individual pots. My use of plastic is reduced because the Soil Cube forms the “pot” out of soil and that is the only “container” I will need until I transplant. With careful handling, the compressed cube of soil will stay together until it is time to transplant as the roots help to hold the cube together. Transplanting a plant in a soil cube has much less of a chance the plant will go into shock because the roots are not disturbed. The roots naturally stop growing when they reach they edges of the soil cube. This is called “air pruning.” Once the cube is transplanted, the roots are perfectly positioned to take off growing into the new container without having become root bound.
In addition to the Soil Cube, I also need a medium in which to grow the seeds and trays to hold them while they are growing. I like to start my seeds in coconut coir. Coconut coir is cheap, plentiful, renewable and comes compressed in blocks that expand greatly when water is added. Coconut coir is sterile which is perfect for starting seeds as there are no diseases or fungus that can damage the seed’s growth. Because coconut coir is sterile, I will need to add fertilizer after the seeds have sprouted their true leaves. Here are a few brands of coconut coir that I use…

As for trays to hold the soil cubes, I use anything from take out containers (on the left), to small plastic trays that I cover with Saran Wrap to use as a cover when I need it (center), to big seed trays that come with a specialized clear top and that hold up to 21 soil cubes (on the right) as you can see in this picture…

Finally, I need a bin large enough to fit the Soil Cube horizontally, some sort of vessel to hold water (I use a small watering can) and a sturdy surface on which to work. I decided to form the soil cubes in my downstairs bathroom after removing the throw rugs. This can be a messy process and the tile floor would be easy to clean up afterwards. The sink counter would provide a sturdy surface, and water was readily available to both wet down the coconut coir and wash my hands between tasks.
Let’s do this! I start by adding water to the coconut coir that I have placed in a bin. I add enough water to make a slurry of a very loose mud-like consistency…

Please pardon the lack of pictures covering every single step from here on out…my hands get dirty and I didn’t want to mess up my phone. Anyways, next I take my Soil Cube maker and dip it horizontally in the slurry. I take my hand and push the coconut coir into the two cubes to make sure they hold as much as possible. I then take the Soil Cube maker out of the slurry bin and over to the counter where I have set a tray. I place the Soil Cube maker down in the tray and firmly press down on the top bar of the Soil Cube device. This pressing down on the bar lowers a plunger down into the two cubes, forces out excess water, and compresses the coconut coir into solid blocks. Here I am pressing down on the bar, notice the water being squeezed out the bottom…

I then take my Soil Cube maker over to the tray that will hold the cubes until they are ready to be transplanted. I position the Soil Cube maker so the bar is on top and the coconut coir is resting on the bottom of the tray. I firmly and evenly press down on the bar while slowly lifting the Soil Cube maker up off the tray. This allows the bar to press down on the cubes and eject them into the trays below. If all goes well, I end up with two cubes that hold together and have a small divot in the top…

If I have to do a little shifting around of the soil cubes in the tray, I am sure to use the wooden tongs that came with the Soil Cube maker. They are the perfect size to gently grip the cubes without needing so much pressure that the cubes break apart…

After I fill my tray with soil cubes, I am ready to plant the seeds. I figure that this year I am going to have a whole tray devoted to starting tomato plants. I have six different types that I want to start. I am particularly interested in the seeds that I saved last year via the fermentation method from tomatoes that my sister’s father-in-law gave me. His name is Gaspare and he has been growing tomatoes in his back yard from seed he carried over from his native Italy years ago. They have great flavor and I would love to grow some of those. I haven’t completely figured out how much space in the garden I will devote to tomato plants, however I am going to start 3 of each variety (6 of Gaspare’s) to make sure I have enough plants and to allow for some seeds failing to grow. Here are the varieties of tomatoes I am starting this year…

Now I carry my trays into the room where I have metal shelving, grow lights and heat mats. This would be a good place to pause and tell you about my heat mats and grow lights. Heat mats provide a steady warmth to the bottom of seed trays. This heat mimics the warm soil of Spring and encourages the seeds to sprout. I leave the heat mat on 24/7 while I have the seeds covered. It uses very little electricity, and it is UL Listed so I have confidence in it’s safety. When the seeds sprout, I remove both the cover and the heat mat. Here is a picture of one of the heat mats that I use…

Some of my pictures will have a strange pink tinge to them because of the grow lights. I use Barrina LED Grow Lights, 252W(6 x 42W, 1400W Equivalent) 4ft T8, Full Spectrum, V-Shape with Reflector Combo, Linkable Design, Plant Lights…from Amazon, of course. You will see one in a later picture. They are daisy-chained together and connected to a timer that automatically shuts them off for 8 hours at night thereby providing the perfect light conditions under which to grow plants. And also thereby providing me the reason not to turn off the lights while taking pictures…it would mess up the timer and I would have to redo it every time. So here you go, the first pink-tinged picture of my full seed tray set in place on top of the heat mat and ready to accept seeds…

But great news for you…I can adjust the color to get rid of most of the pink hue. Here is the same picture after adjusting the saturation to make it easier on your eyes…

Still pinkish…but easier on your eyes, I think.
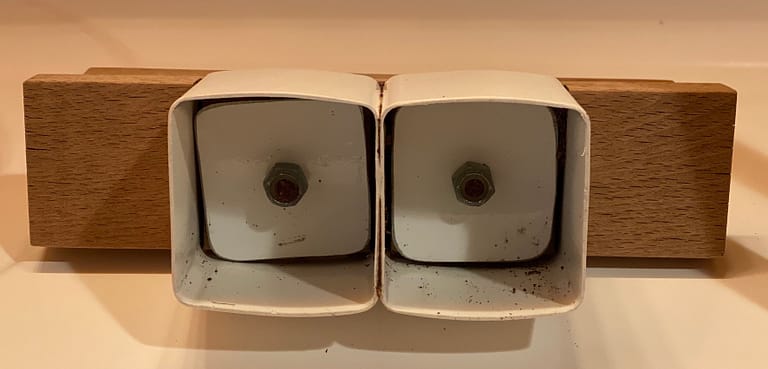
Now, the reason for those divots in the top of the soil cube becomes apparent. That is where I will place the seeds and the divot is set at a depth that is suitable for most seeds to start to grow.

I fill all the holes with three seeds to allow for some failing to sprout. Later on, after I am confident all the seeds that will sprout have sprouted, I will thin the seedlings to one per cube using scissors. But for right now, I cover all the seeds in the divots with some coconut coir and place the clear cover over the tray. By the way, when planting my seeds I make a rough chart on a piece of paper so I know exactly which seeds were planted in what cubes. I also keep track of which plants I plant and where they are in the garden. I like to keep track so next year I can plant the vegetables that tasted good and were successful providers and not waste my time on vegetables that I did not care for or that did not grow well. (Try it, Katrina, my gardening buddy! But you be you…I am not judging!) So, now the seeds have everything they need to start to grow…consistent warmth from the heat mat below and moisture from the soil cube. Until the seeds emerge, the grow lights are not necessary but, since they will be needed soon, I elect just to keep them on so I don’t have to redo the timer. Here is what my completed seed tray looks like…

I plant my tray of peppers, leeks and broccoli the same way. After cleaning up the bathroom and my tools, I begin the waiting game. Every day I come down and pop the lid off the trays and look for any seedlings that may have emerged. It is always exciting when I spot new growth. It represents the promise of good things to come. I look forward to a summer of watching plants that I grew from seed grow to provide delicious, healthy food for my table. That feeling touches something deep down in my soul. I look forward to the challenge of gardening in a completely new climate here in Wisconsin. And a challenge it will surely be…because as I sit here writing this in late April, I am gazing out onto the 2 inches of snow that fell last night. Wow…and it really is supposed to be warm enough to transplant the tomatoes outside in six weeks??? I do have a few tricks up my sleeve to keeps plants protected from the weather, but more on that in another post.
Thanks for reading!
UPDATE: April 24th. Success!!! Wililililililililililililililili…that’s for you, Alex ;). ALL of my tomato soil cubes have at least one tomato seedling in them. Most have multiple seedlings which I will have to thin out soon. Yes, even Gaspare’s tomatoes have sprouted and that is a personal triumph for me because it is the first time I attempted to save tomato seeds.

From here on out, I will keep the clear cover off the tray as well as remove the heat mat. I will water the cubes by gently adding warm water to the bottom of the tray. This will encourage the roots to grow to the bottom of the cube to soak up the moisture. I have hung the grow lights on chains attached to the bottom of the shelf above using “S” hooks. This makes the height of the grow lights easily adjustable. I try and keep the lights just a few inches above the seedlings so they do not get “leggy”, or tall and spindly, from having to “reach” for the light. Sometimes I even use a combination of chain adjustment and lifting up from below the tray, as pictured below, all in an effort to maximize grow light exposure.

UPDATE #2: April 26th. Most of my pepper plants that I planted the same day as the tomatoes have now sprouted.
Hi! I really like your post!